
SpringBoot+Nacos+Dubbo+Seata分布式事务简明教程
2021-08-19 02:49:44 晓掌柜 版权声明:本文为站长原创文章,转载请写明出处
一、前言
顾名思义,分布式事务一版是在分布式场景下才会出现,是由多个本地食物组合而成的事务。比如在我现有的项目中的文章模块新增
为例,一个操作会涉及到文章数据的增加、用户行为数据采集分析、操作记录保存等。它们是分属在不同的系统模块之中,但是如果任意
一个环节出现问题就需要做数据的全部回滚,不然就会出现脏数据。
目前比较常用的分布式事务解决方案主要有以下几个:
① 基于XA协议的两阶段提交:2PC
② 三阶段提交:TCC
③ 基于MQ最终一致性的解决方案
PS:这里我们要介绍的是第一种解决思路的其中一个解决方案 - Seata。另外挖个坑,后面会对分布式事务解决方案及其他实现做一个系统
文章哈
二、Seata
2.1、什么是Seata
Seata前身就是阿里蚂蚁金服的:FESCAR,它就是为了解决又要实现事务的最终一致性,又要保证整体系统的高性能、
高吞吐还要解决为了实现以上的事务2PC或者是TCC时不对已经写好的业务代码进行太多的“侵入式破坏”来设计的。
Seata可以为我们提供AT、TCC、SAGA和XA事务模式,打造一站式的分布式解决方案。
PS: 这里贴一下其git地址:https://github.com/seata/seata 及管网文档地址: https://seata.io/
2.2、使用前提
数据库方面:基于本地的ACID事务的关系型数据库
应用层方面:通过JDBC进行数据库访问的JAVA应用
2.3、整体机制
① Seata是两阶段提交的模式:
一阶段:业务数据和回滚日志记录在同一个本地事务中提交,释放本地锁和连接资源
二阶段:提交异步化,非常快速完成;异常回滚时通过一阶段的回滚日志进行方向补偿
② 写隔离:一阶段时,在本地事务进行提交时需要确保先拿到 全局锁,拿不到全局锁就不能提交事务。拿到全局锁的事务被限制在
一定范围内(eg:超时时间、没有异常),超出这个单位后将被放弃并进行事务回滚,同时释放锁。
③ 读隔离
在数据库自身事务隔离级别为 读已提交、或以上的基础上。Seata默认的全局事务隔离级别是 读未提交。如果在特定的场景下需要
配置为读已提交,则需要使用 select for update 的语句进行代理。
2.4、Seata术语
TC:事务协调者,维护全局和事务分支的状态,驱动全局事务的提交或回滚
TM:事务管理器,定义全局事务的范围(开启提交全局事务,提交全局事务、回滚全局事务)
RM:资源管理器,管理分支事务处理的资源,与TC交谈以注册分支事务状态,报告分支事务状态,驱动分支事务提交或回滚
三、Seata接入简明教程
3.1、环境介绍
本次的整体环境如下:
JDK1.8、MySql8.0、SpringBoot2.2.6、MyBatis-plus3.1.0、Nacos2.0、Dubbo2.7.5、Druid1.1.23
3.2、环境搭建
Nacos + Dubbo的搭建这里就不做赘述了,可以参考我之前的文章:Nacos+Dubbo项目搭建简明教程,这里主要介绍Seata相关。
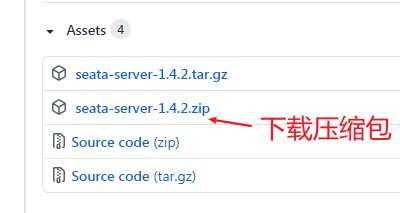
3.3、下载Seata
以1.4.2为例,进入 https://github.com/seata/seata/releases/tag/v1.4.2,到底部进行下载
3.4、解压到本地并配置(这一步非常关键)
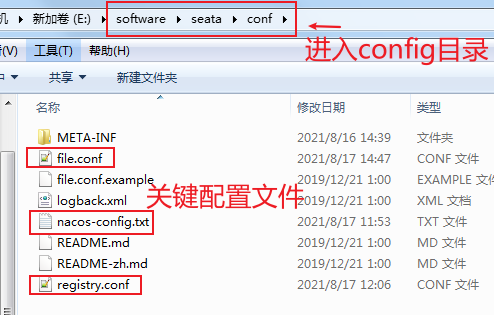
首先打开registry.config文件,我们可以看到Seata支持多种配置方式,这里我们以file为例。修改如下:
registry {
  # file 、nacos 、eureka、redis、zk、consul、etcd3、sofa
  type = "file"

  nacos {
    serverAddr = "localhost"
    namespace = ""
    cluster = "default"
  }

  file {
    name = "file.conf"
  }
}

config {
  # file、nacos 、apollo、zk、consul、etcd3
  type = "file"

  nacos {
    serverAddr = "localhost"
    namespace = ""
  }

  file {
    name = "file.conf"
  }
}
然后配置file.conf文件如下。这里有关键注意项 vgroupMapping.my_tx_group = "default" 和 default.grouplist = "127.0.0.1:8091"
transport {
  # tcp udt unix-domain-socket
  type = "TCP"
  #NIO NATIVE
  server = "NIO"
  #enable heartbeat
  heartbeat = true
  # the client batch send request enable
  enable-client-batch-send-request = true
  #thread factory for netty
  thread-factory {
    boss-thread-prefix = "NettyBoss"
    worker-thread-prefix = "NettyServerNIOWorker"
    server-executor-thread-prefix = "NettyServerBizHandler"
    share-boss-worker = false
    client-selector-thread-prefix = "NettyClientSelector"
    client-selector-thread-size = 1
    client-worker-thread-prefix = "NettyClientWorkerThread"
    # netty boss thread size,will not be used for UDT
    boss-thread-size = 1
    #auto default pin or 8
    worker-thread-size = 8
  }
  shutdown {
    # when destroy server, wait seconds
    wait = 3
  }
  serialization = "seata"
  compressor = "none"
}
service {
  #transaction service group mapping
  vgroupMapping.my_tx_group = "default"
  #only support when registry.type=file, please don't set multiple addresses
  default.grouplist = "127.0.0.1:8091"
  #degrade, current not support
  enableDegrade = false
  #disable seata
  disableGlobalTransaction = false
}

client {
  rm {
    async.commit.buffer.limit = 10000
    lock {
      retry.internal = 10
      retry.times = 30
      retry.policy.branch-rollback-on-conflict = true
    }
    report.retry.count = 5
    table.meta.check.enable = false
    report.success.enable = true
  }
  tm {
    commit.retry.count = 5
    rollback.retry.count = 5
  }
  undo {
    data.validation = true
    log.serialization = "jackson"
    log.table = "undo_log"
  }
  log {
    exceptionRate = 100
  }
  support {
    # auto proxy the DataSource bean
    spring.datasource.autoproxy = false
  }
}
3.5、创建Seata所需要的的数据表
CREATE TABLE `undo_log` (
  `id` bigint(20) NOT NULL AUTO_INCREMENT,
  `branch_id` bigint(20) NOT NULL,
  `xid` varchar(100) NOT NULL,
  `context` varchar(128) NOT NULL,
  `rollback_info` longblob NOT NULL,
  `log_status` int(11) NOT NULL,
  `log_created` datetime NOT NULL,
  `log_modified` datetime NOT NULL,
  `ext` varchar(100) DEFAULT NULL,
  PRIMARY KEY (`id`),
  UNIQUE KEY `ux_undo_log` (`xid`,`branch_id`)
) ENGINE=InnoDB AUTO_INCREMENT=4 DEFAULT CHARSET=utf8;
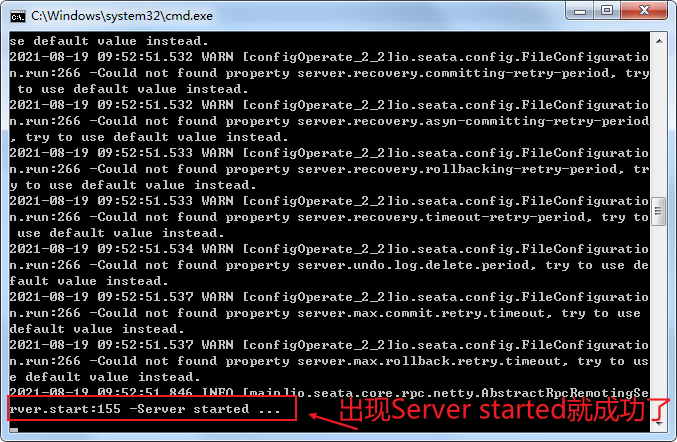
3.6、启动Seata
进入Seata的bin目录下,windows下启动 seata-server.bat。linux下执行 ./seata-server.sh
四、项目集成核心代码
4.1、引入Maven
        <!-- Alibaba Seata-->
        <dependency>
            <groupId>io.seata</groupId>
            <artifactId>seata-all</artifactId>
            <version>1.4.2</version>
        </dependency>
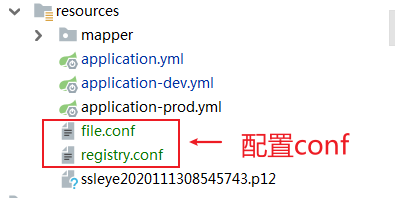
4.2、项目conf文件配置
在项目的resources目录下配置registry.conf和file.conf。内容和Seata服务端的一致就行
4.3、使用Seata datasource proxy来代理dubbo事务
创建SeataAutoConfig.class,内容如下:
package com.xa.providerweb.modules.config.seata;

import com.alibaba.druid.pool.DruidDataSource;
import com.baomidou.mybatisplus.extension.spring.MybatisSqlSessionFactoryBean;
import io.seata.rm.datasource.DataSourceProxy;
import io.seata.spring.annotation.GlobalTransactionScanner;
import org.apache.ibatis.session.SqlSessionFactory;
import org.apache.ibatis.transaction.jdbc.JdbcTransactionFactory;
import org.mybatis.spring.SqlSessionFactoryBean;
import org.springframework.beans.factory.annotation.Autowired;
import org.springframework.boot.autoconfigure.jdbc.DataSourceProperties;
import org.springframework.context.annotation.Bean;
import org.springframework.context.annotation.Configuration;
import org.springframework.context.annotation.Primary;
import org.springframework.core.io.support.PathMatchingResourcePatternResolver;

/**
* @author XA
* date 2021/8/16 15:13
 * description: seata配置
*/
@Configuration
public class SeataAutoConfig {

    /**
     * autowired datasource config
     */
    @Autowired
    private DataSourceProperties dataSourceProperties;

    /**
     * init durid datasource
     *
     * @Return: druidDataSource  datasource instance
     */
    @Bean
    @Primary
    public DruidDataSource druidDataSource(){
        DruidDataSource druidDataSource = new DruidDataSource();
        druidDataSource.setUrl(dataSourceProperties.getUrl());
        druidDataSource.setUsername(dataSourceProperties.getUsername());
        druidDataSource.setPassword(dataSourceProperties.getPassword());
        druidDataSource.setDriverClassName(dataSourceProperties.getDriverClassName());
        druidDataSource.setInitialSize(0);
        druidDataSource.setMaxActive(180);
        druidDataSource.setMaxWait(60000);
        druidDataSource.setMinIdle(0);
        druidDataSource.setValidationQuery("Select 1 from DUAL");
        druidDataSource.setTestOnBorrow(false);
        druidDataSource.setTestOnReturn(false);
        druidDataSource.setTestWhileIdle(true);
        druidDataSource.setTimeBetweenEvictionRunsMillis(60000);
        druidDataSource.setMinEvictableIdleTimeMillis(25200000);
        druidDataSource.setRemoveAbandoned(true);
        druidDataSource.setRemoveAbandonedTimeout(1800);
        druidDataSource.setLogAbandoned(true);
        return druidDataSource;
    }

    /**
     * init datasource proxy
     * @Param: druidDataSource  datasource bean instance
     * @Return: DataSourceProxy  datasource proxy
     */
    @Bean
    public DataSourceProxy dataSourceProxy(DruidDataSource druidDataSource){
        return new DataSourceProxy(druidDataSource);
    }

    /**
     * init mybatis sqlSessionFactory
     * @Param: dataSourceProxy  datasource proxy
     * @Return: DataSourceProxy  datasource proxy
     */
    @Bean
    public MybatisSqlSessionFactoryBean sqlSessionFactory(DataSourceProxy dataSourceProxy) throws Exception {
        MybatisSqlSessionFactoryBean  factoryBean = new MybatisSqlSessionFactoryBean ();
        factoryBean.setDataSource(dataSourceProxy);
        factoryBean.setMapperLocations(new PathMatchingResourcePatternResolver()
                .getResources("classpath*:/mapper/*.xml"));
        factoryBean.setTransactionFactory(new JdbcTransactionFactory());
        return factoryBean;
    }

    /**
     * init global transaction scanner
     *
     * @Return: GlobalTransactionScanner
     */
    @Bean
    public GlobalTransactionScanner globalTransactionScanner(){
        return new GlobalTransactionScanner("guangmuhua_seata_application", "my_tx_group");
    }
}
4.4、使用注解开启分布式事务
在一个service方法上使用注解:@GlobalTransactional(timeoutMills = 300000, name = "guangmuhua_seata_application")
我们分别在方法中写入数据更新和插入业务,同时使用1/0和手动抛出Runtime异常来模拟异常场景。
    @Override
    @GlobalTransactional(timeoutMills = 300000, name = "guangmuhua_seata_application")
    public R seataTest() throws TransactionException {
        System.out.println("全局事务:" + RootContext.getXID());
        articleApi.addReadingVolumeById(1L);
        /* if(1==1){ */
            /* throw new RuntimeException("分布式事务异常回滚"); */
        /* } */
        int a = 1/0;
        articleApi.addArticleTest();
        return R.ok();
    }
4.5、执行效果
① 首先我们把发法中的异常代码注释掉,运行发现文章ID为1的阅读量增加了,同时也写入了一个测试数据
② 我们把任意一个异常代码的注释恢复后,运行发现虽然在异常前做了文章阅读量的更新操作,但是实际并没有改变
消费者控制台如下:

生产者控制台如下:
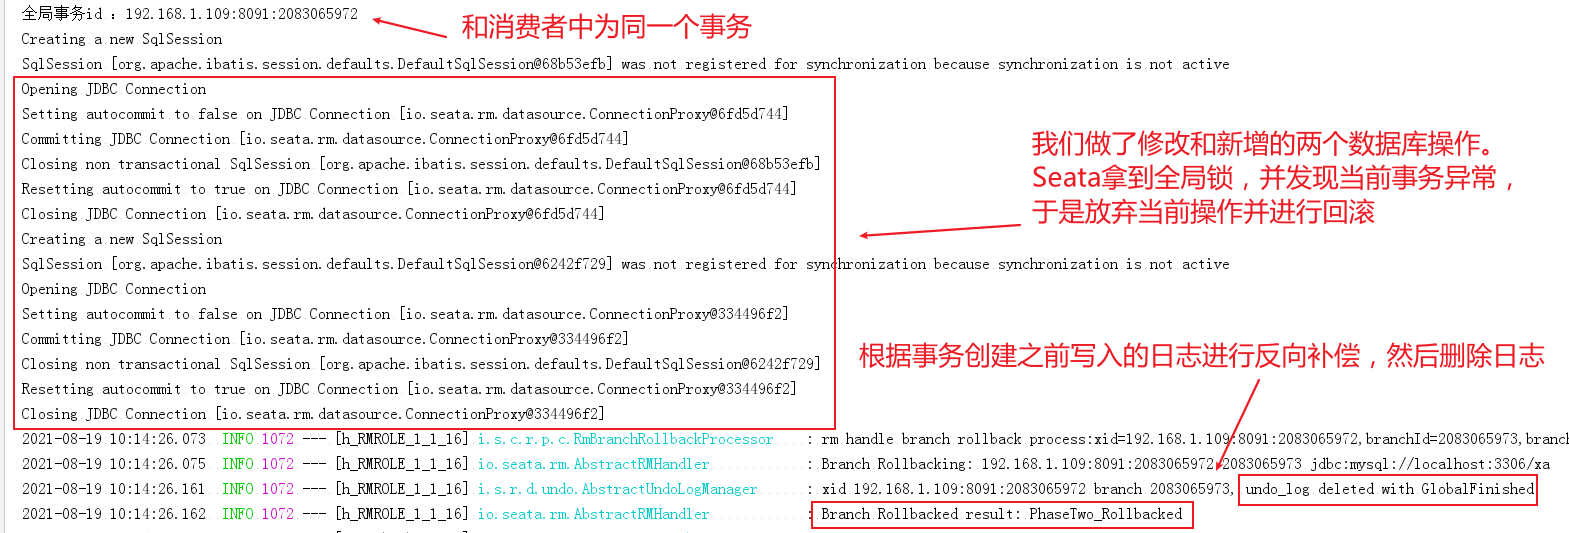
五、复盘
① 首先,项目在启动时,读取当前配置文件,注册到RM资源管理

② 使用了@GlobalTransactional注解的方法运行时,Seata拿到全局锁创建一个分布式事务,写入回滚日志并进行文章阅读量增加和测试数据
写入的操作。当这个尝试出现异常时,放弃当前事务并按照对应的回滚日志进行反向补偿,随后删除回滚日志并释放全局锁。
六、注意事项
6.1、vgroupMapping.my_tx_group的配置
我们在file.conf.example中可以发现它是:vgroup_mapping.my_test_tx_group = "default"。但是在我使用的1.4.2版本中通过源代码查找发现
在Seata进行服务分组信息查找时,使用的是 vgroupMapping + key,而不是 vgroup_mapping + key

6.2、配置属性要一致
vgroupMapping.my_tx_group = "default" 中 my_tx_group是服务分组的key,所以在SeataAutoConfig.class中要一致
    @Bean
    public GlobalTransactionScanner globalTransactionScanner(){
        return new GlobalTransactionScanner("guangmuhua_seata_application", "my_tx_group");
    }
6.3、seata与Mybatis-plus的冲突
在SeataAutoConfig中配置SqlSessionFactory时要使用MybatisSqlSessionFactoryBean

6.4、版本冲突
很多情况下,因为版本冲突也会产生很多问题。所以出现问题时也可以冲这方面查找
6.5、数据库自动更新字段导致不能回滚
当我们用了数据库自动更新字段时(比如updateTime为当前时间戳信息),会导致无法回滚。解决方案:建议不要在sql语句中
操作自动更新的字段。
七、后记
本文是在初次使用Seata时的一些个人体会,如存在不严谨和错误之处,敬请斧正。同时本篇文章也会随着本人对Seata的了解不断完善...
更多精彩请持续关注:guangmuhua.com